As you might already know, the Content Hub is a great tool for storing our awesome content. We can easily maintain and distribute it across all our channels. No matter if we use our assets on a Sitecore XM site, a custom build SPA or a mobile app. The Content Hub supports all channels. But how do you make sure that you can supply the proper image format for each given system? After reading this blog post, you'll know everything there is to know!
First things first, which elements are we using within the Content Hub? The main ingredients are Asset, Renditions, Public links and transformations. Only the transformations are optional chose. All other parts are mandatory. If you put them all together visual, you get the following image.
Every content that we want to share via the DAM, start with an Asset. This is the start point of our delivery. In this case, I've chosen an image asset. The content that we deliver outside the Content Hub will be based on this asset. To increase the performance of the Content Hub, it makes use of four predefined renditions; Original, Preview, Big Thumbnail, Thumbnail cropped and Thumbnail. These renditions are mostly used within the Content Hub. To show images on preview, grid view, etc. But as you can see in the image above, we will also use the same renditions when creating a Public Link.
A public link is a point to the Content Hub CDN, where our image is stored for the outside world. Out of the Box, Content Hub doesn't create a public link automatically. You need to create it yourself for each asset. You could of course automate this process via a script.
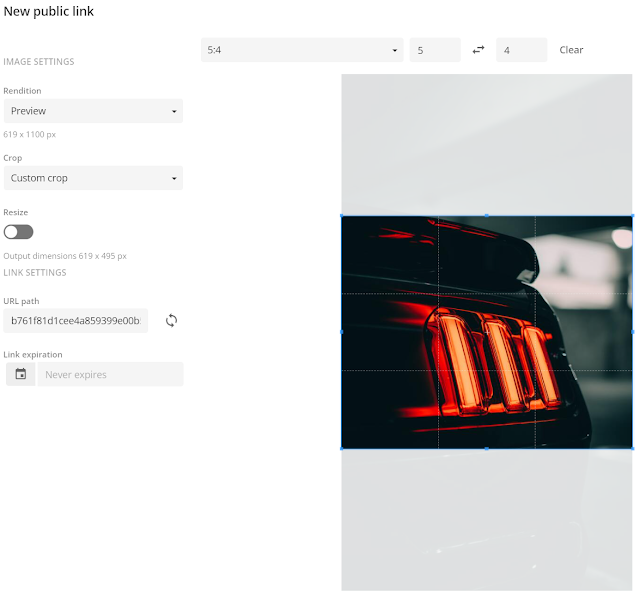
For use to create a public link, click on the Asset Detail page on the ... in the upper right corner and click on Public Link. Hit the + Public link button to open up the New public link modal. Here you can configure the image that we want to share. This is also the place where you can do a crop or change the aspect ratio. The most important thing to remember is, start with the rendition that is the smallest for your need. So if the original image is 3252 * 5781 and you need a 450 * 800, don't use the Original rendition, but instead make use of the Preview rendition. This rendition is already scaled down to 1100 * 1100 and therefore cost less performance. Keep this in mind.
Last, but not least, we can also use a transformation on our Public link. A transformation is an on the fly image that will be created by Content Hub, only when it's requested. It will also not be stored on the CDN!
How can we use a transformation with our Public link? That is actually quite easy to do. The only thing that you need, is to know which transformations are available. You can find them in the Management Portal -> Transformations. In order for this to work you combine the two things as follows: [public url]&t=[transformationname]. An example would be: https://[cdnurl]/api/public/content/cbacbd87f94a493baa589e7ea21a38a0?v=4eb67349&t=w320.
Warning
Always check what the resolution is of the public link before adding a transformation to it. If your image has a lower resolution than the selected transformation, it will NOT scale to that size. It will limit itself to its maximum size. For example, an image of 300 * 300 can't transform into an image bigger than that resolution. So if you would request a transformation w1200, you will end up with an image of 300 * 300.
Tip
Make use of automatic public link generation based on a given type. This way you can create default public links that have for example the resolution added to the public link name. This way it's easier for your clients to select the proper image resolution.
For now, I wish you all a very well deserved Christmas break. Hope to see you after the holidays!
Copyright Rodion Kutsaev


