Just two weeks ago, Sitecore released their latest version of their Connector for Content Hub. An awesome new release with multiple benefits. The Connector now includes the DAM and CMP modules rolled into one module. For the full release, check out my previous blog post.
Today I started upgrading to the new version. In this blog, I will share my first thoughts on implementing this version. The first thing that I checked, if they had fixed the issue that I found in the previous DAM connector. It had to do with setting up the URI for the entity in Content Hub DAM Module. It wasn't yet fixed, but at least they have included an explicit warning to not have a '/' at the end of the Content Hub URI. See the screen below.
Besides this minor issue, the upgrade went smoothly. The biggest catch when upgrading? You'll lose all the entity mappings that you already made before the upgrade. Be sure to create a backup before upgrading. That way, you can retrieve or recreate the entity mappings you had earlier.
Enough of that, what about the new features that were introduced? Well, we can now use the CMP taxonomy provider to sync taxonomy values from Content Hub as tags with corresponding items in Sitecore XP. At first, when I tried this, I ran in too a couple of issues. With this next information, I hope to spare you some time. No need to repeat my mistakes again.
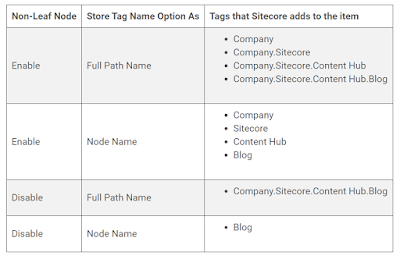
In the Installation and Configuration Guide you will find a section about creating a tag field mapping. In that document, you'll find the information that is needed. In the text below, I will guide you step by step through the whole process. But, before we can start, we need to have an Entity Mapping in Sitecore XP, an Entity with a taxonomy relation in Content Hub and a working export pipeline between the Content Hub and Sitecore XP.
For this example, I will use the Blog content. As this ships with the Content Hub OOTB. The Blog content has the Audience property, which is a taxonomy relation and therefore suitable for this example.
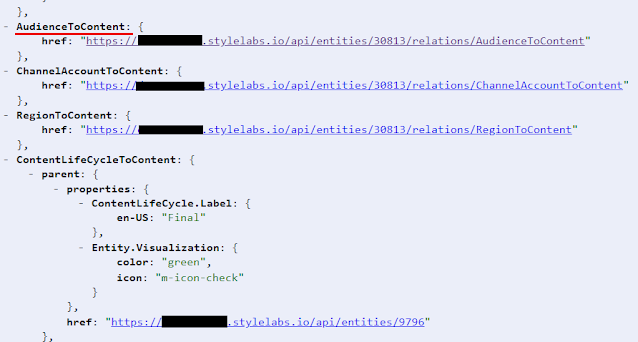
Go to your Sitecore instance and navigate to the following location: sitecore\System\Modules\CMP\Config\{your entity mapping}. Right-click your entity mapping and select Tag Field Mapping. Give it a helpful name and click OK. This will create a new tag mapping for you to configure. A good place to start, to find the name of the relation of the entity is to view the API output of that entity. Go to the following URL: https://{your content hub instance}/api/entities/{entityID}. Then scroll down to the property you're looking for. In our case, we need to look for "Audience". As you can see, I found the relation named "AudienceToContent". The name of the relation is what we need for the configuration in Sitecore XP.
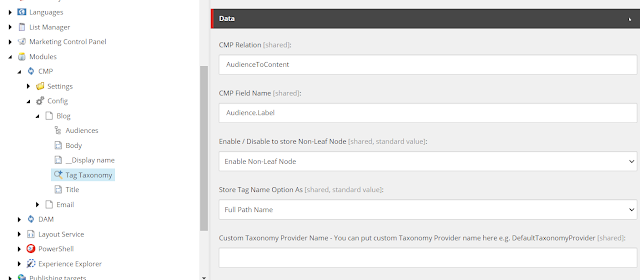
Click on the link in the "href" of "AudienceToContent", you can see the items that are linked. Choose one of the items. This will show the property name of the Audience taxonomy. It's called "Audience.Label". Now that we have the two property names we need for the Entity Mapping, we can continue working in Sitecore XP. Open up your tag mapping and fill in the following fields:
- CMP Relation: "AudienceToContent"
- CMP Field Name: "Audience.Label"
- Leave the other fields unchanged.
When finished, your configuration should look similar to the image below.
Now that we have finished the configuration, we can make an adjustment to our Blog entity. This will activate our export trigger to Sitecore XP. For this example, I've added the following audiences: "Health focus", "Need a boost", "Sporty" and "On the go". The trigger is configured to be activated each time a change was made. For a production setting, you will definitely want to check the workflow status as well, before activating the export trigger.
The only thing we need to do now, check the Sitecore item. Go to the bucket and search for the item. Scroll down to the Tagging option and open the pane. It should look like this. In the image below you can now see the four audiences that we added earlier in the Content Hub.
If you haven't got the Tagging option. Click on View in the topbar and enable Standard fields. This will enable the standard fields and also show the Tagging option. Verify that you've got the tags that you have assigned in the Content Hub earlier.
Debugging
When something goes wrong, it's always nice to know where to look. When the sync between the Content Hub and Sitecore XP goes wrong, you can check the following locations.
- Content Hub, verify that:
- the trigger has been activated and executed
- the action has executed
- Service bus has received the message
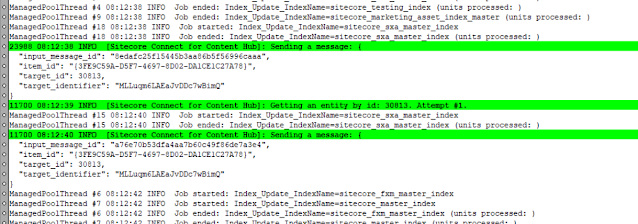
- Sitecore XP, check out the logs. You can find them in the following location: C:\inetpub\wwwroot\{sitecore instance}\App_Data\logs. What I normally do, delete all the logs in this folder. The active logs won't be able to delete. After this, open the "log.{current data}.txt". Search for "Sitecore Connect for Content Hub" in the log to find your message.
Sometimes it's nice to follow the logs while they are written. For this, I use the Baretail tool. It's a simple tool that allows you to follow the tail of the document. It automatically scrolls down when additions are made to the document. Another cool option, you can add custom highlights to the document. For example, see my highlight for the Content Hub sync.
I hope you enjoyed reading this post. If you've any questions drop me a message below, or send me a message on Twitter or Linked.
For more information check out the following links:


