Last time, we discussed what we can do with the Sitecore Connect for Sitecore CMP. This time, we will take a dive into setting up such a connection.
Before we can start we're going to need the following things:
- Sitecore Content Hub v3.4
- Sitecore Experience Platform v9.2, 9.3 or 10
- Sitecore Connect for Sitecore CMP v3.0
- Azure Service Bus
Azure Service Bus
The communication between the two systems will be done through messages that are sent between a service bus. For this example, we will make use of the Azure Service Bus. Check out the Microsoft documentation page to get your free credits to start. You'll need to create a Service Bus in the Azure Portal. Make sure to choose "Standard" or "Premium" when selecting a tier. Otherwise, you don't have the option to create a Topic for pub/sub messaging. The CMP connect relies on pub/sub messaging, so make sure to select the proper tier.
After creation, create a new topic for your messages. After that click on the topic and also create a subscription for it. This is what going to need later on in the process. The only thing we need now is the connection string to connect with the Service Bus. The CMP module needs two entry points, one for writing and one for reading, also known as Listen policy in Azure. For testing purposes, you could also use the RootManageSharedAccessKey. This will give full access to the system that uses the token. Don't use this token in a production environment.
Now that we have set-up the Azure Service Bus, we can continue with the Sitecore Content Hub.
Sitecore Content Hub
Make sure you have the correct version before continuing with this guide. You can check your version of Content Hub by adding "/api/status" to the end of the Content Hub URL. It's also possible to check out the Create portal. If you don't have the appropriate version, please spin up a new environment with the correct version.
For the CMP module to do its work, Sitecore XP will need to have the credentials of a Sitecore Content Hub user with superuser rights. Create a new user and make sure to store it credentials, we will need this later on in the process.
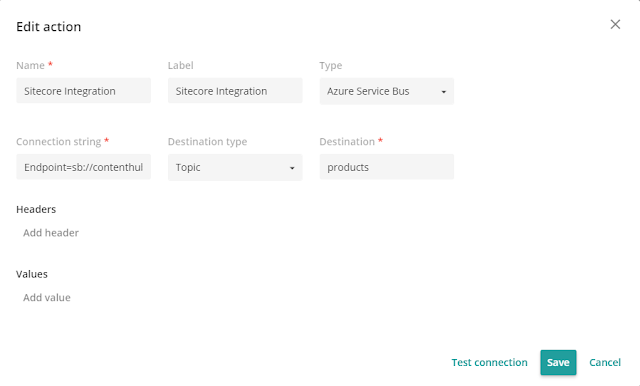
Now, that we have a user, we can continue with setting up a trigger and combine it with an action. Create a new Action in the Manage section. Make sure to add a connection string with the write rights of the Azure Service Bus, as the Content Hub is going to sent messages to it. Enter your topic name in the Destination. Click on Test connection to verify the Content Hub can make a connection with the service bus.
The last thing we need to do in the Content Hub is wire up the action with a trigger. Go to Triggers in the Manage section and create a new one. Make sure to give it a descriptive name and don't forget to fill in the description. For the objective select Entity modification, for the Execution type make sure to select In background. Then continue, by switching to the Conditions tab. Add the M.Content definition and specify your conditions. For instance, only approved assets can be published, etc. Last, but not least. Click on the Actions tab. Add the action you just created and hit Save.
Before continuing, make sure that the trigger hits the action and that the message was sent to the service bus. You can do this by creating a new Content item, a blog for instance. In the Azure Portal, the Azure Service Bus has the option to peek the messages in the bus. You can find the Serice Bus Explorer under Azure Service Bus -> Topic -> Service Bus Explorer. Check to see if there is a message. If so, continue with the next step.
Sitecore Experience Platform
The last step in this guide, is to configure the Sitecore XP. We will need to do a couple of things:
- Install Sitecore Connect For Sitecore CMP v3.0 module
- Configure Content Hub connection strings in the ConnectionStrings.config
- Configure content and mappings
Let's start with the first step. Installing the CMP module into the Sitecore XP. If you don't have already downloaded the module, go to the Download page, and select the module for your Sitecore version. After downloading the module, log in on your Sitecore XP site and click on Control Panel. Start the Installation Wizard by clicking on Install a package in the Administration section. Upload the module package and then select it to have it installed. Wait a moment for it to be installed. When the installation is finished, it will tell you that you need to add the following connection strings:
- <add name="CMP.ContentHub" connectionString="ClientId={client_id};ClientSecret={client_secret};UserName={username};Password={password};URI={uri};" />
- <add name="CMP.ServiceBusEntityPathIn" connectionString="{Azure Service Bus connection string with incoming topic}" />
- <add name="CMP.ServiceBusSubscription" connectionString="{Subscription name}" />
- <add name="CMP.ServiceBusEntityPathOut" connectionString="{Azure Service Bus connection string with outcoming topic}" />
In the connection strings, insert the following values:
- Client_id and Client_secret: these settings must correspond to the settings of the LogicApp in the OAuth Clients in the Sitecore Content Hub. To verify these settings: open the Sitecore Content Hub and on the ribbon, click Manage, click OAuth Clients, click LogicApp, and click Edit. Username and password - these fields must correspond to the values in the Sitecore Content Hub for the user that you created.
- URI - set the URI to Sitecore Content Hub
- Incoming topic - set the connection string for the Azure Service Bus and set the name for the topic of the messages posted by the Sitecore Content Hub, posted after the trigger is fired. Make sure that the connection string contains the incoming topic. You can do this by adding the property EntityPath={topicname}
- Subscription name - set the name of the subscription. You can find the name of the subscription in the Azure Service Bus portal under the created Topic.
- Outgoing topic - set the name of the topic of the messages posted to the Azure Service Bus after content is imported to Sitecore. Make sure that the connection string contains the incoming topic. You can do this by adding the property EntityPath={topicname}
You can find the Sitecore connection string config in the following directory "{installdir of Sitecore}\App_Config\ConnectionStrings.config. After changing and save the config make sure to restart Sitecore. This way, Sitecore will read the changed settings from the config.
Now we have set-up the connection between Azure Service Bus and Sitecore XP, we can continue with configuring the content. The content that is synchronized to Sitecore XP can be enormous in the end. Therefore Sitecore decided to store the content in a bucket. This will ensure performance stays on par, even when a large number of items are stored in the bucket. Open the Content Editor of your Sitecore instance. Create a new bucket under the sitecore -> Content -> CMP item. Give the bucket a name to your liking. This is where the CMP module will create the Content Hub items.
Now we have a place to store the items, we need to make sure that we have a template for the items within Sitecore. Create a new template with the appropriate fields that we need from the Content Hub entity. The naming doesn't need to be the same. When the template is finished, we will create a mapping for each Content Type so Sitecore understands how to process an entity. Before leaving the template area, add the Content Hub Entity as base template for our newly created template. The Content Hub Entity can be found under sitecore -> templates -> CMP. Save the template.
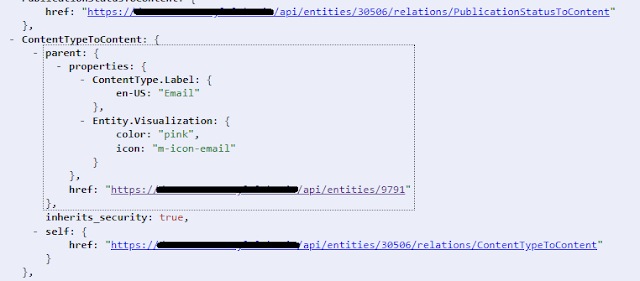
The last step is to create a translation between the Sitecore Content Hub entity and the Sitecore XP item. Navigate to sitecore -> system -> Modules -> CMP. Right click on Config, click Insert -> Entity Mapping. Now that we have a mapping, we need to configure it. For the Content Type Id we need to fill in the Content Type of the entity. To get it, go to your Content Hub and find and open your entity. Copy the ID from the entity in the URL. Change your URL as follows https://{content hub instance}/api/entities/{entity id} . It will return a JSON file. Look in the relations block for ContentTypeToContent relation. See the image below for an example.
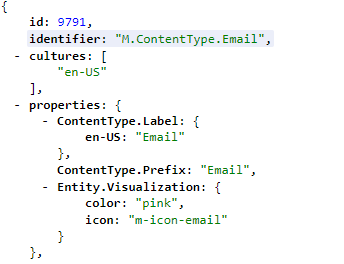
Within the ContentTypeToContent block, you can see that there is an href property with an URL. Click on the URL. This will open the relation with the API and you'll see the Content Type Id of your entity. In my example you can see I've used an Email content. So we need to fill in M.ContentType.Email as the content type id.
For the bucket, we can select the bucket we just created in the drop-down. The same goes for the template. Select the template that was created earlier. When done, hit save. Sitecore XP now knows that we would like to handle this content type. The items still will be empty, since we haven't mapped any fields between the entity and the item. We can fix this by adding field mappings. To create a field mapping, right-click the Entity mapping item that you created earlier. Click Insert, and then click Field mapping. Now we need two names, the CMP Field Name, is the internal name of the content-type field. You can get the fields by opening the entity through the API, as we did earlier. In our case, we will use the following two fields: Email_Subject and Email_Body. For the Sitecore Field Name, we need to enter the name of the Sitecore item we created earlier. For every field, a mapping needs to be created. Save all the mappings.
All the configuration is now finished! Let's change a content entity within the Content Hub and make sure that the action is fired. It's always good to check your Sitecore logs during the testing phase. The Sitecore logs can be found at {Sitcore Installdir}\App_Data\logs. The log that you're interested in, is the latest version of the log.{datetime}.txt. Search for entries that contain [Sitecore Connect for Sitecore CMP]. For example:
40184 10:33:56 WARN No session Id managers were found to manage the session Id for the current request. Default asp.net session manager will be used.
ManagedPoolThread #10 10:33:56 INFO The endpoint 'https://devicedetection-ces.cloud.sitecore.net/' for the service 'DeviceDetection' has been cached.
40184 10:33:56 INFO [Sitecore Connect for Sitecore CMP]: Getting an entity by id: 29577. Attempt #1.
ManagedPoolThread #10 10:33:57 INFO Job ended: Update device detection DB (units processed: )
For more information check the official Guide from Sitecore.
Have fun while coding!


